
Hello Folks, we are here with something very interesting topic for php fans. Today we will see a simple CRUD in laravel.
Laravel is a web application framework with an expressive, elegant syntax. Laravel Is MVC(Model View Controller) architecture.
Laravel has a large and growing community which makes it easy for new developers to find solutions and help with challenges. Laravel releases a new version twice in a year, and the latest version which is Laravel 8 was released on the 8th Sept 2020.
This article will help you to create basic CRUD in laravel. Don’t worry if you are a beginner we will start from scratch. Laravel has many inbuilt functionalities ready to use which makes laravel a magical framework.
A couple of things you need to have in your system before starting.
- Composer
- PHP
- Server (WAMP, XAMPP)
Here we are going to use MySQL. So if you have wamp or xampp then you don’t need to do anything additional.
You must require a composer in your system. Now the question is what is the composer. In short, a Composer is a tool for dependency management in PHP. It allows you to declare the libraries your project depends on and it will manage (install/update) them for you.
We will learn more about the composer in the next post. Now you can install the composer by clicking here.
Moving forward to laravel-8 simple CRUD app we will go step by step so it makes it more easy and understandable.
Step 1: Install Laravel
Go to you command prompt and run the following command :
composer create-project laravel/laravel=8.0 laravel_crudIt will take a few minutes depending on your internet speed. It will download the laravel framework and required dependencies.
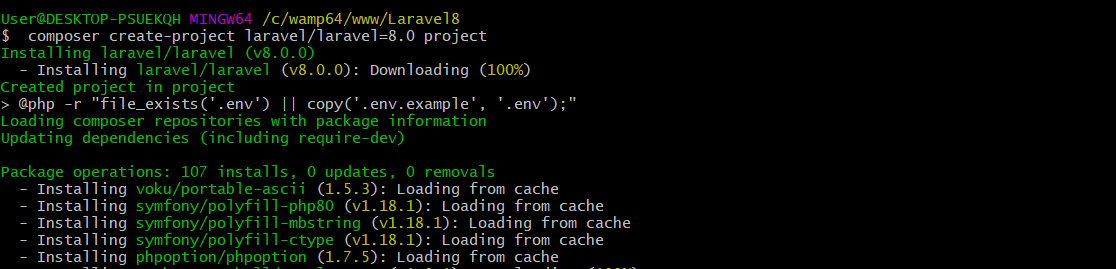
Using this command you don’t need to copy .env.example to .env and also you don’t need to generate APP_KEY this is a new version of larave
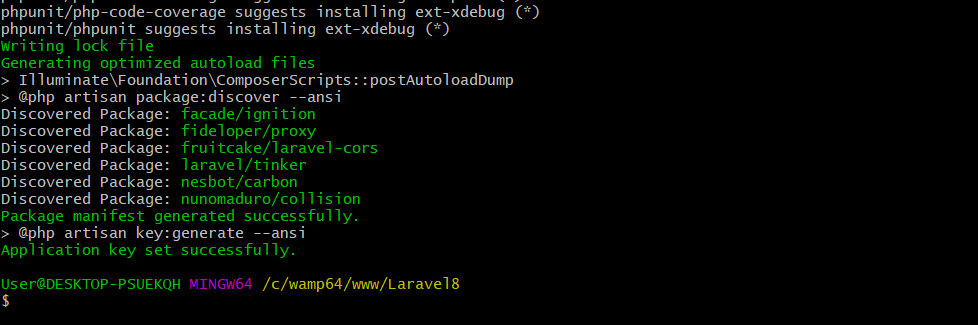
After a successful full install, you will see a message. And Larave APP is ready.
Run command in your terminal
php artisan servYou will see the following message.
Starting Laravel development server: http://127.0.0.1:8000
Now run 127.0.0.1:8000 in your browser you will see laravel landing page
Step 2: Database setup
Open PHPMyAdmin and create a new database. My database name is laravel_crud
Open the .env file on your IDE or text editor
DB_CONNECTION=mysql
DB_HOST=127.0.0.1
DB_PORT=3306
DB_DATABASE=laravel_crud
DB_USERNAME=root
DB_PASSWORD=
Change the DB_DATABASE to the name of your database and if you have set a username and password for your PHPMyAdmin, specify it, otherwise, leave the username as root and password blank.
Step 3: Creating Migration
Before moving forward you need to know about laravel migrations.
Migrations are like version control for your database, allowing your team to modify and share the application’s database schema. Migrations are typically paired with Laravel’s schema builder to build your application’s database schema.
If you have ever had to tell a teammate to manually add a column to their local database schema, you’ve faced the problem that database migrations solve.
you can read more about migration by clicking this link.
I will elaborate on it in the next post. Now we will continue to CRUD.
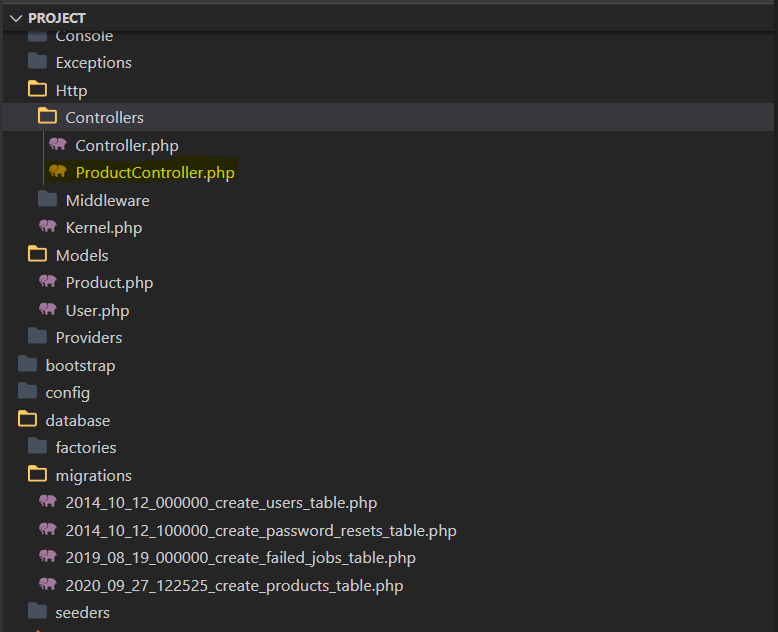
You can see migration files in the following path :
\database\migrations
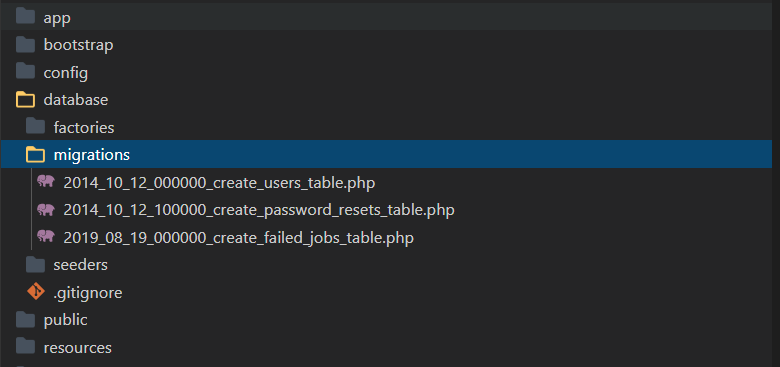
Laravel gives default migration for the user, password reset & jobs
You can create different migrations as per your requirement. Now we are creating migration for the product table. So go to the terminal or Command prompt and write the following command. there is a quick twist. To create migration we need to run the following command
php artisan make:migration create_products_table --create=productsBut we have to create Models & controller so we will create migration , model & controller by using one command :
php artisan make:model Product -mcr
You can see 3 files created in your project.
A migration file will be created in the database/migrations folder, and we need to create our schema. I added name (string), description(text), sku(string), price (float).
I used $table->timestamps(); it will set created_at and updated_at automatically.
use Illuminate\Database\Migrations\Migration;
use Illuminate\Database\Schema\Blueprint;
use Illuminate\Support\Facades\Schema;

class CreateProductsTable extends Migration
{
    /**
     * Run the migrations.
     *
     * @return void
     */
    public function up()
    {
        Schema::create('products', function (Blueprint $table) {
            $table->bigIncrements('id');
            $table->string('name')->nullable();
            $table->text('description')->nullable();
            $table->decimal('product_price', 12, 2)->default(0);
            $table->timestamps();
        });
    }

    /**
     * Reverse the migrations.
     *
     * @return void
     */
    public function down()
    {
        Schema::dropIfExists('products');
    }
}
Before we run our migration command, we need to set the default string length, else, we are going to run into errors So go to
app/Providers/AppServiceProvider.php
/**
     * Bootstrap any application services.
     *
     * @return void
     */
    public function boot()
    {
        Schema::defaultStringLength(191);
    }
to the boot function, also add At the top
namespace App\Providers;

use Illuminate\Support\ServiceProvider;
use Illuminate\Support\Facades\Schema;
Finally, we run our migration command
php artisan migrate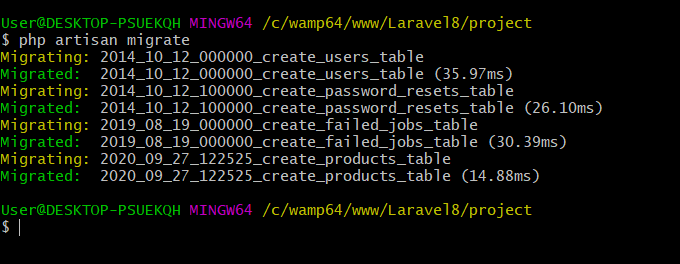
Step 4: Add Resource Route
We need to add routes for our CRUD operations, Laravel provides a resource route for us that will take care of the CRUD, that is a route to Create, another route to Retrieve, a separate route to Update, and finally a route to Delete.
So head up to routes\web.php and add our resource route
Route::resource(‘products’, ProductController::class); ProductController::class this was introduced in this version, Laravel 8 does not know where to call the function from
use App\Http\Controllers\ProductController’
use Illuminate\Support\Facades\Route;
use App\Http\Controllers\ProductController;

/*
|--------------------------------------------------------------------------
| Web Routes
|--------------------------------------------------------------------------
|
| Here is where you can register web routes for your application. These
| routes are loaded by the RouteServiceProvider within a group which
| contains the "web" middleware group. Now create something great!
|
*/

Route::get('/', function () {
    return view('welcome');
});

Route::resource('products', ProductController::class);
Step 5: Controller and Model
You can find the following methods in the controller folder
app/Http/Controllers/ProjectController.php
- index()
- This method is used for display listing or landing view.
- create()
- this methods used for show create form
- store(Request, $request)
- This method used for store data to the table
- show(Product, $product)
- This method use to show records details
- edit(Product, $product)
- This method used to show edit form with filled data to inputs.
- update(Request, $request, Product, $product)
- This method is used to update records.
- destroy( Product, $product)
- This method is used to delete records from the table.
I had mentioned the basic use of all resource methods. We will see each method in the future in this post.
Laravel 8 has created a folder called Models, which is not available in the previous version, so our project model is found in the app/Models/Product.php
You need to add fillable to insert column value in DB. We create a method of the model so we need to specify which column should be created.
app/Models/Product.php
namespace App\Models;

use Illuminate\Database\Eloquent\Factories\HasFactory;
use Illuminate\Database\Eloquent\Model;

class Product extends Model
{
    use HasFactory;
    public $timestamps = true;

    protected $fillable = [
        'name',
        'description',
        'product_price',
    ];
}
Step 6: Add your views
Now move to the front end views. Larvel has a blade file structure for frontend. It’s necessary to follow the directory structure to interact with our app easily. So we will manage by the following structure.
- Layouts
- app.blade.php
- products
- Index.blade.php
- Create.blade.php
- Edit.blade.php
- show.blade.php
If we are creating another module then we can add a new dir and put all the blade files in that folder so it looks clean and easy to manage.
But we will create a form.blade file so we no need to manage to create & edit separate files.
- products
- Index.blade.php
- form.blade.php
- show.blade.php
Here \resources\views\layout\app.blade.php looks like this
<html>

<head>
    <title>App Name - @yield('title')</title>

    <!-- Bootstrap -->
    <link href="https://cdnjs.cloudflare.com/ajax/libs/twitter-bootstrap/4.0.0-alpha/css/bootstrap.css" rel="stylesheet">

    <style>
        .pagination{
            display: block;
        }
        .pagination nav{display: block;}
        .pagination nav .rounded-md svg{width: 10px;}
    </style>

    <!-- Font Awesome JS -->
    <script defer src="https://use.fontawesome.com/releases/v5.0.13/js/solid.js"
        integrity="sha384-tzzSw1/Vo+0N5UhStP3bvwWPq+uvzCMfrN1fEFe+xBmv1C/AtVX5K0uZtmcHitFZ" crossorigin="anonymous">
    </script>
    <script defer src="https://use.fontawesome.com/releases/v5.0.13/js/fontawesome.js"integrity="sha384-6OIrr52G08NpOFSZdxxz1xdNSndlD4vdcf/q2myIUVO0VsqaGHJsB0RaBE01VTOY" crossorigin="anonymous">
    </script>

</head>

<body>

    <div class="container">
        @yield('content')
    </div>

</body>

</html>
We need to create index.blade.php in the product folder. Need to extend the layout file. We created \resources\views\layout\app.blade.php file and it will be the base of all views. Here we can set css and js
You can find we have added some css for pagination. Now move to resources\views\products\index.blade.php file you can find there is a table which has a listing of products and also has an action to edit, view, delete.
Move to app\Http\Controllers\ProductController.php you can find index() for render view and data.
app\Http\Controllers\ProductController.php
/**
     * Display a listing of the resource.
     *
     * @return \Illuminate\Http\Response
     */
    public function index()
    {
         $products = Product::latest()->paginate(5);

        return view('products.index', compact('products'))
            ->with('i', (request()->input('page', 1) - 1) * 5);
    }
Here we had added pagination(5). Laravel provides inbuilt pagination features. Just we need to put pagination() and pass the number of rows you want and do nothing. For display pagination, we need to set
$products->links()It will show all page numbers with next & previous navigation.
Now you can find a button beside the Laravel 8 crud title. From here we can navigate to add product form.
 <a class="btn btn-success" href="{{ route('products.create') }}" title="Create a product"> <i class="fas fa-plus-circle"></i>
                    </a>
app\Http\Controllers\ProductController.php
/**
     * Show the form for creating a new resource.
     *
     * @return \Illuminate\Http\Response
     */
    public function create()
    {
        return view('products.form');
    }
When we click on the button we redirect to the create form wish is our resources\views\products\form.blade.php
@extends('layouts.app')

@section('content')
    <div class="row">
        <div class="col-lg-12 margin-tb" style="margin-top:50px;">
            <div class="pull-left">
            <h2>{{(isset($product)) ? 'Edit' : 'Add New'}}  Product</h2>
            </div>
            <div class="pull-right">
                <a class="btn btn-primary" href="{{ route('products.index') }}" title="Go back"> <i class="fas fa-backward "></i> </a>
            </div>
        </div>
    </div>

    @if ($errors->any())
        <div class="alert alert-danger">
            <strong>Whoops!</strong> There were some problems with your input.<br><br>
            <ul>
                @foreach ($errors->all() as $error)
                    <li>{{ $error }}</li>
                @endforeach
            </ul>
        </div>
    @endif
    <form action="{{ (isset($product)) ? route('products.update', $product->id) : route('products.store') }}" method="POST" >
        @csrf
        @if(isset($product))
            @method('PUT')
        @endif

        <div class="row">
            <div class="col-xs-12 col-sm-12 col-md-12">
                <div class="form-group">
                    <strong>Name:</strong>
                    @php
                        $name = (old('name')) ? old('name') : ((isset($product->name)) ? $product->name : '');
                    @endphp
                    <input type="text" name="name" class="form-control" placeholder="Name" value="{{$name}}">
                </div>
            </div>
            <div class="col-xs-12 col-sm-12 col-md-12">
                <div class="form-group">
                    <strong>Description:</strong>
                    @php
                        $description = (old('description')) ? old('description') : ((isset($product->description)) ? $product->description : '');
                    @endphp
                    <textarea class="form-control" style="height:50px" name="description" placeholder="description">{{$description}}</textarea>
                </div>
            </div>
            <div class="col-xs-12 col-sm-12 col-md-12">
                <div class="form-group">
                    <strong>Price:</strong>
                    @php
                        $price = (old('product_price')) ? old('product_price') : ((isset($product->product_price)) ? $product->product_price : '');
                    @endphp
                    <input type="number" name="product_price" class="form-control" placeholder="price" value="{{$price}}">
                </div>
            </div>
            <div class="col-xs-12 col-sm-12 col-md-12 text-center">
                <button type="submit" class="btn btn-primary">Submit</button>
            </div>
        </div>
    </form>
@endsection
This form used for add and edit as well. So we have passed the $product from the controller. You will find an edit function of the controller.
app\Http\Controllers\ProductController.php
/**
     * Show the form for editing the specified resource.
     *
     * @param  \App\Models\Product  $product
     * @return \Illuminate\Http\Response
     */
    public function edit(Product $product)
    {
        return view('products.form', compact('product'));
    }
It’s for code reusability. If there is a large number of fields and complex forms then we can use a separate view for the edit to avoid complexity.
Now move to the resources\views\products\show.blade.php Here we had shown details of the product is quite simple and easy. We have passed the project object from the controller.
app\Http\Controllers\ProductController.php
/**
     * Display the specified resource.
     *
     * @param  \App\Models\Product  $product
     * @return \Illuminate\Http\Response
     */
    public function show(Product $product)
    {
        return view('products.show', compact('product'));
    }
resources\views\products\show.blade.php
@extends('layouts.app')


@section('content')
    <div class="row">
        <div class="col-lg-12 margin-tb" style="margin-top:50px;">
            <div class="pull-left">
                <h2>  {{ $product->name }}</h2>
            </div>
            <div class="pull-right">
                <a class="btn btn-primary" href="{{ route('products.index') }}" title="Go back"> <i class="fas fa-backward "></i> </a>
            </div>
        </div>
    </div>

    <div class="row">
        <div class="col-xs-12 col-sm-12 col-md-12">
            <div class="form-group">
                <strong>Name:</strong>
                {{ $product->name }}
            </div>
        </div>
        <div class="col-xs-12 col-sm-12 col-md-12">
            <div class="form-group">
                <strong>Description:</strong>
                {{ $product->description }}
            </div>
        </div>
        <div class="col-xs-12 col-sm-12 col-md-12">
            <div class="form-group">
                <strong>Price:</strong>
                {{ $product->price }}
            </div>
        </div>
        <div class="col-xs-12 col-sm-12 col-md-12">
            <div class="form-group">
                <strong>Date Created:</strong>
                {{ date_format($product->created_at, 'jS M Y') }}
            </div>
        </div>
    </div>
@endsection
Step 6: Add your views
So basically we need to pass data to the controller Store method.
In this method we have to do backend validation. Click here to know more about laravel validation by clicking this link
When we submit the form data will be passed to the store method of ProductController. Here the first request will be validated, if data passes the validation then it will store it to the table.
/**
     * Store a newly created resource in storage.
     *
     * @param  \Illuminate\Http\Request  $request
     * @return \Illuminate\Http\Response
     */
    public function store(Request $request)
    {
        $request->validate([
            'name' => 'required',
            'description' => 'required',
            'product_price' => 'required'
        ]);

        Product::create($request->all());

        return redirect()->route('products.index')
            ->with('success', 'Product created successfully.');
    }
Same for the update function but we have to pass the object of the product model and it will update that row.
/**
     * Remove the specified resource from storage.
     *
     * @param  \App\Models\Product  $product
     * @return \Illuminate\Http\Response
     */
    public function destroy(Product $product)
    {
        $product->delete();

        return redirect()->route('products.index')
            ->with('success', 'Product deleted successfully');
    }
We need to pass the object of the Product modal and it will delete that record that’s it.
So now ProductController looks like this.
<?php

namespace App\Http\Controllers;

use App\Models\Product;
use Illuminate\Http\Request;

class ProductController extends Controller
{
    /**
     * Display a listing of the resource.
     *
     * @return \Illuminate\Http\Response
     */
    public function index()
    {
         $products = Product::latest()->paginate(5);

        return view('products.index', compact('products'))
            ->with('i', (request()->input('page', 1) - 1) * 5);
    }

    /**
     * Show the form for creating a new resource.
     *
     * @return \Illuminate\Http\Response
     */
    public function create()
    {
        return view('products.form');
    }

    /**
     * Store a newly created resource in storage.
     *
     * @param  \Illuminate\Http\Request  $request
     * @return \Illuminate\Http\Response
     */
    public function store(Request $request)
    {
        $request->validate([
            'name' => 'required',
            'description' => 'required',
            'product_price' => 'required'
        ]);

        Product::create($request->all());

        return redirect()->route('products.index')
            ->with('success', 'Product created successfully.');
    }

    /**
     * Display the specified resource.
     *
     * @param  \App\Models\Product  $product
     * @return \Illuminate\Http\Response
     */
    public function show(Product $product)
    {
        return view('products.show', compact('product'));
    }

    /**
     * Show the form for editing the specified resource.
     *
     * @param  \App\Models\Product  $product
     * @return \Illuminate\Http\Response
     */
    public function edit(Product $product)
    {
        return view('products.form', compact('product'));
    }

    /**
     * Update the specified resource in storage.
     *
     * @param  \Illuminate\Http\Request  $request
     * @param  \App\Models\Product  $product
     * @return \Illuminate\Http\Response
     */
    public function update(Request $request, Product $product)
    {
       $request->validate([
            'name' => 'required',
            'description' => 'required',
            'product_price' => 'required'
        ]);

        $product->update($request->all());

        return redirect()->route('products.index')
            ->with('success', 'Product updated successfully');
    }

    /**
     * Remove the specified resource from storage.
     *
     * @param  \App\Models\Product  $product
     * @return \Illuminate\Http\Response
     */
    public function destroy(Product $product)
    {
        $product->delete();

        return redirect()->route('products.index')
            ->with('success', 'Product deleted successfully');
    }
}
The whole demo project is available on GitHub so that you can see the code in context.
The next time I read a blog, Hopefully it doesnt fail me just as much as this one. I mean, Yes, it was my choice to read through, but I actually thought you would have something useful to say. All I hear is a bunch of moaning about something that you could fix if you werent too busy searching for attention.
Hello! Do you use Twitter? I’d like to follow you if that would be ok. I’m absolutely enjoying your blog and look forward to new posts.